Saturday, December 8, 2018

PowerPoint YouTube Video Launch

YouTube is a wonderful source for content that can be used in classrooms. Recently I've noticed several classrooms using YouTube videos to provide their students with a much needed movement break. If a teacher uses several YouTube videos, however, the time required to find and launch a specific video may create problematic 'wait time'.


With this is mind, I've been using PowerPoint to seamlessly launch frequently-used YouTube videos in the classroom! The following is an example of a YouTube launch created for a classroom. This format works great on most interactive whiteboards (allowing students to approach the board and make a selection) or in smaller classes it can be facilitator-assisted on the classroom computer. 


The launch is basically a PowerPoint page with 12 buttons, each depicting a different YouTube video (visuals are achieved through screen shots). 

When the teacher clicks on one of the 12 buttons, it announces the choice (sound file created in Audacity and imported) and navigates to a second page that depicts an enlarged version of your choice (ensures that everyone in the group can hear and see the choice)


To program a button to go to another page
Right click on the target button/cell
Select Action Settings
Select Hyperlink to …
Select the specific slide where the enlarged version resides (in this example the enlarged version of Get Your Body Moving is on slide 5 of my document).


This enlarged version helps the students auditorily and visually prepare for the video to come. The enlarged cell is programmed with the internet URL for that specific YouTube video, Get Your Body Moving. When you click on the cell, PowerPoint opens the YouTube video on the internet. 

To program a button to open a URL
Right click on the button 
Select Action Settings (bottom of the list)
Select Hyperlink to …
Select URL and paste the specific URL for that YouTube video into the box (when you are on the page where your YouTube video resides, you can spot the URL as it starts with https://)


Yay! … but … you and your students must now to 'sit through' an annoying ad  ... and you must select the full screen icon to display the video in full screen mode. Oh ... if only we could make it open in Full Screen mode ... Joe Spanberger (Director of Information Systems at the Kennedy Children's Center in NYC) to the rescue!!!!! Joe suggested and discovered how to alter the URL to automatically open the video in full screen mode. Thank you, Joe!!!

To alter the URL to open the YouTube video in full screen mode
Use the following URL and replace the bracketed green text with the video ID
https://www.youtube.com/embed/[replace bracketed text with video ID]?rel=0 

What part of the original URL is the video ID?      (the text after v= is the video ID)
Chicken Dance             https://www.youtube.com/watch?v=npp1z32idrc
Meatballs & Banana     https://www.youtube.com/watch?v=BQ9q4U2P3ig

Here's what the altered/new URL would look like:
Chicken Dance            https://www.youtube.com/embed/npplz32idrc?rel=0 
Meatballs & Banana     https://www.youtube.com/embed/BQ9q4U2P3ig?rel=0 
Can't Stop the Feeling  https://www.youtube.com/embed/KhfkYzUwYFk?rel=0

After viewing the video, close down the page and press the blue arrow to navigate back to the choice page. 

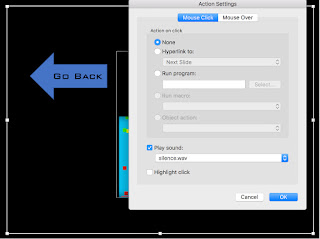
What may not be evident is the fact that there is a black rectangle positioned behind the arrow and the enlarged image. This black rectangle is programmed with inert 'silence' that prevents PowerPoint from moving on to the next page if any area other than the arrow or enlarged picture is accidentally touched


This PowerPoint launch design can accommodate a host of topics:
  • If you are conducting a program-wide theme focused on Nursery Rhymes or Fairy Tales, you could create a launch to organize YouTube videos to support that theme. 
  • Conducting a unit on Apples & Pumpkins? There is a wealth of content on YouTube for that topic. 
  • You have a student that is obsessed with Dinosaurs? I see a Dinosaur launch in your future.

Visit the Bloom Where You're Planted Store on Teachers Pay Teachers to download a FREE sample resource called PowerPoint YouTube Launch.  Although it may not reflect your YouTube choices, it can certainly serve as a template. 

Now go forth boldly and make life easier in the classroom!

Monday, November 12, 2018

Alphabet Resource

Alphabet is a resource designed for children with Visual Impairments. On the surface it  seems simple, but it can be customized to offer so much more.  


This resource presents three versions:

Version 1 - one letter per page/slide

Version 2 - several letters per page/slide … reflecting the groupings of the traditional 'ABC Alphabet Song'. Touch the letter and the letter name is announced.


Version 3 - several letters per page/slide … reflecting the groupings of the traditional song

      but with illustrated faces that can be easily swapped for photo faces of your students. 
  • Frank's photo face is substituted next to the letter F
  • Assad's photo face is substituted next to the letter A
  • Miriam's photo face is substituted next to the letter M
  • Roger's photo face is substituted next to the letter R
  • Zuni's photo face is substituted next to the letter Z
  • Bethany's photo face is substituted next to the letter B
      To Substitute Faces
      To substitute Frank's photo face for the illustrated face next to the F (right click on the illustrated face … select Change Picture…. navigate to where the substitute face resides on your computer.  Presto! As illustrated below, the illustrated face has been substituted with the photo face of your student.
 
As an aside, all other graphics on the page are programmed with 'silence'. This ensures that touching anywhere else on the page does not prematurely move you to the next page. To move to the next page you must click on/ touch the page arrow. 

You may wish to 'program' the  imported photo face to announce the student's name. 
Touch the letter and it announces the letter name; touch the photo face and it announces the child's name.

You can create audio name files for your students using a free app called Audacity. You can even change your voice recording into a child's voice by changing the pitch level by 15 or 20%. (Effect … Change Pitch). A previous blog post  (http://bit.ly/ASbySs_ChildVoice) provides detailed information for achieving this goal. To import this audio, right click on the photo face … select Action Settings…. select Other Sound (at the bottom of the audio list) and navigate to the new audio file that you wish to import. 

Students sharing the same first letter in their name
If more than one child has a name starting with the same letter, e.g. Frank & Franny, you will need to duplicate the head + body next to the letter, move it, then replace the duplicated photo face with Franny's face. Now you have two children next to the F letter, Franny and Frank. 


Don't forget, this resource can be displayed on the 'big screen' (interactive whiteboard, large screen TV using Apple TV) or the 'small screen' (computer monitor, iPad/Android tablet using the free Microsoft PowerPoint app). 

There is also a Alphabet Vest Display Version! https://www.teacherspayteachers.com/Product/Alphabet-Song-Vest-Display-VI-4157890 

Please visit the Bloom Where You're Planted Store on the Teachers Pay Teachers site to view these products (use link button in upper right)

…’til the next post …  (new posts every Monday)

Visit my website   http://animatedstep-by-steps.com
Follow me on twitter www.twitter.com/@AnimStepbySteps
Follow me on facebook www.facebook.com/AnimatedStepBySteps
Email me canadiangoosse@gmail.com

©2018 Carol Goossens’, Ph.D.
Augmentative Communication Consultant
Speech-Language Pathologist
Special Educator

Monday, October 29, 2018

Incorporating Props Using the Melissa & Doug Play Sets

Animated Step-by-Steps® lend themselves beautifully to structured pretend play.  Read and animate the page together, then act out what you just read and saw, using play materials that support the activity. When using the symbol-supported versions (i.e., Picture Communication Symbols, SymbolStix) the symbols are available to provide Aided Language Stimulation!

I've always loved the Melissa & Doug wooden play sets (https://www.melissaanddoug.com)  .... and as luck would have it, many of them dove-tail beautifully with Animated Step-by-Steps® resources.
(play set images derived from the Melissa & Doug website)


                                                                                               Perfect Pasta Play Set


                                                                                    Bake & Decorate Cupcake Set


                                                                                           Baby Food & Bottle Set


                                                                                                 Catch & Count Fishing Game

                                                                                                      Make-a-Cake Mixer Set
                                                                                               Keys & Cars Rescue Garage


                                                                                            Birthday Party Play Set

                                                                                                  Cutting Fruit Set

                                                                               Magnetic Wooden Dress Up Dolls


                                                                                                           Flip & Serve Pancake Set


                                                                                                                  Smoothie Maker Blender Set

                                                                                           Scoop & Stack Ice Cream Cone Play Set

                                                                                                 Make & Serve Apple Pie Set

                                                                                                          Bread & Butter Toast Set

                                                                                                     Slice & Toss Salad Set
                                                                                                                  Bake & Serve Brownie Set    
                                                                                                                   Wooden Farm Magnets
                                                                                                    Baking Play Set
                                                                                                                  Top & Bake Pizza Counter


                                                                                             Farm Friends Set
                                                                                  Play Time Produce
                                                                                  Fruit Set
                                                                                   Vegetables Set
                                                                                     

                                                                                                      Slice & Bake Cookie Set


                                                                                                                       Slice & Sort Wooden Eggs
                                                                                                                       Sandwich Making Set  
                                                                                     Animal Sound Puzzles


                                                                                                3 Little Pigs Play Set
                                                                                                Alphabet Sound Puzzle
                                                                          Spin Art
                                                                                                   Wooden Checkers 
                                                                                          Snowman Stacker
                                                                               Wooden Dinosaur Magnets
                                                                                          Wooden Animal Sound Puzzles
                                                                                           Animal Rescue Shape Sorting Task


As you know from a previous blog post,  http://bit.ly/AddingSymbolsCore48 you can easily 'harvest' symbols from your Animated Step-by-Steps® and add them to the fringe/supplemental zone of the Core 48 PowerPoint Display. 


It's all about having fun  ... and learning lots of skills in the process!


…’til the next post …  

Visit my website   http://animatedstep-by-steps.com
Follow me on twitter www.twitter.com/@AnimStepbySteps
Follow me on facebook www.facebook.com/AnimatedStepBySteps
Email me canadiangoosse@gmail.com

©2018 Carol Goossens’, Ph.D.
Augmentative Communication Consultant
Speech-Language Pathologist
Special Educator


Monday, October 22, 2018

Optimizing Graphics for Children with VI

The Animated Step-by-Steps® designed for children with Visual Impairments were created using high contrast graphics, presented on a black background.  The images are often outlined in white, to ensure that they 'stand out' on the page. 

When appropriate, I use the Correction feature in PowerPoint to make graphics lighter to promote better figure-ground contrast.


To  further enhance the 'figure-ground' differential, I typically create a narrow white border around the graphic. As illustrated in the image below, the white outline does indeed help the rock stand out against its black background and enhances the shape cues inherent in that object.  


When I bring images into PowerPoint, they are typically imported with a transparent background. For further information on creating images with transparent backgrounds please refer to a previous blog post.

The white outline can be easily achieved using a photo imaging program such as Photoshop or Photoshop Elements.  As programs vary greatly in their available tools, I will present two options for outlining an image.

Strategy 1: Adding a Stroke

- open the image in Photoshop or Photoshop Elements.


-use the magic wand to select the background of the image


-under Select on the menu bar, select inverse to highlight only the foreground, not the transparent background of the image.


-set the paint color to white
-set the paint brush size to the width of the line you wish to produce around your graphic (Note: this value will vary depending upon the dpi. of your image.
-select paths (under Window on the menu bar), then select stroke path.


-a white line will magically appear around the image.

Strategy 2: Using the Expand Selection Command

-open the image (with a transparent background) in Photoshop or Photoshop Elements


-create a second layer (use the icon with a turned up corner at bottom to create a new layer) and position it below the original layer.


-use the paint can to drop white into this layer. We will now call this the 'white layer'.


-use the magic wand tool to select the background of the image in the original top layer


-under Select (menu bar) select inverse to invert your selection, i.e. you have now selected the image as opposed to the background. Now select the 'white layer'.


-under Select (menu bar) select the Expand command from the drop down menu. Enter in a pixel value that will determine the width of your border (varies with the dpi of your image)


-select delete on your keyboard to eliminate the background in the white layer,  leaving a white border around the image. 

-save your newly outlined image as a png (the .png format retains the transparency of the background image)


You now have an image lightened and outlined in white that stands out beautifully on its black background. Perfect for students with Visual Impairment!


…’til the next post … 

Visit my website   http://animatedstep-by-steps.com
Follow me on twitter www.twitter.com/@AnimStepbySteps
Follow me on facebook www.facebook.com/AnimatedStepBySteps
Email me canadiangoosse@gmail.com

©2018 Carol Goossens’, Ph.D.
Augmentative Communication Consultant
Speech-Language Pathologist
Special Educator