
The Animated Step-by-Step Chuga Chuga Song (sung to the tune of Frère Jacques) appears to be a favorite
in many preschool and Kindergarten classrooms.
The beauty of this song is that it can be conducted as an echoing refrain:
Here’s the train (sung by the teacher) … Here’s the train(sung by the students)
Let’s get in
(teacher) …Let’s get in (students)
Chuga Chuga (pause) toot toot (teacher)…Chuga Chuga (pause) toot toot (students)
Off we go (teacher) …Off we go (students)

This Animated Step-by-Step is very effective when displayed
on the interactive whiteboard, with the clicks to animate being mediated by a
remote switch (see upcoming post regarding Establishing Remote Switch Access). It is even more
effective, however, when personalized with pictures of students in the class!
I have found the strategy of personalizing songs/poems with
student photos to be an excellent way to heighten engagement during a Circle
Time routine.

You will need to take photos of each child in your class, preferably
against a white background. The white
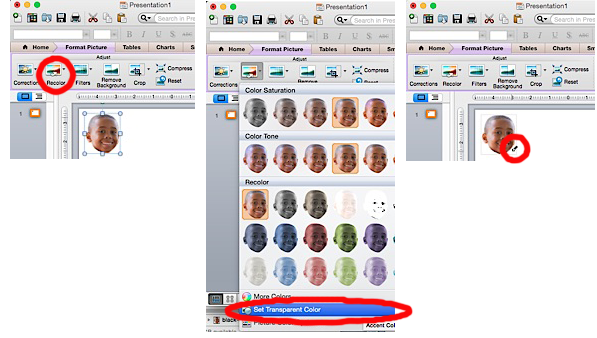
background is crucial because it will allow you to easily make the background transparent in PowerPoint. As illustrated below, paste the photo face
into PowerPoint, then while it is still selected … select Format Picture ... Recolor
… Set Transparent Color … then tap the wand provided, in the white
background that you wish to be made transparent. Your version of PowerPoint may
look different than mine but please be assured these functions are probably available
in your program.
B. Convert your .pps
files into .ppt
As mentioned in earlier posts, the files you download from
the Teachers Pay Teachers site are read
only PowerPoint Show files. You will need to change the file name from
Chuga Chuga Song.pps to Chuga Chuga Song.ppt in order to personalize (edit) the file.
C. Add your new photo
faces to the .ppt file
If you are really savvy with PowerPoint animations, you can
probably accomplish this conversion easily … but a cautionary note … you will need to pay close attention to
where and how animations are being introduced in the animation sequence. Many
of the graphics are grouped graphics (e.g., head grouped with generic body).
When you ungroup a graphic in the original file or alternately paste another
face over the existing graphic then regroup it, the original animation is
cancelled. Technically the original graphic
to which the animation was assigned no longer exists. As a result you will need
to explore what animation was
used and note where it was used in the animation sequence, before you proceed with adding the photo faces.
To serve an effective literacy agenda, a poem should be re-read over a
span of time. I have found it fun to use the downloaded version for the first few
readings, then introduce your personalized version as a surprise on the third
or fourth reading. So … just when their interest may begin to lag, a new twist
is introduced that revives their interest! Actually you’ll get tired of reading
the poem, long before they do!
Don’t worry if you have more students in your class than
slots in the poem. There are more than enough poems using children as the
characters to represent everyone over time. Other poems amenable to being
personalized are Ordering Pizza and Ten Brave Firefighters.
... 'til the next post …
© 2015 Carol Goossens’, Ph.D.
canadiangoosse@gmail.com

