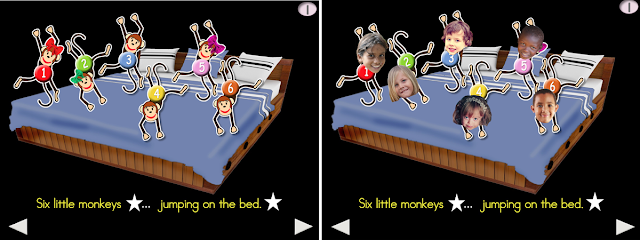
Personalizing has always been a very powerful technique for nurturing greater student engagement. In the past, only resources specifically designed for personalizing could be adapted with photo faces. Ideally, all ASbySs should be candidates for personalizing but gulp … the thought of going back to retrofit over 600 ASbyS resources made me 'weak in the knees'.
6 Little Monkeys VI is a resource that I recently posted in my TpT Store. After posting the resource, I promptly regretted the fact that I had not created the resource in a way that would allow for easy personalization. ARRRRGH! How short-sighted of me! So this had me agonizing ... yet again ... how can we retrofit existing resources allowing them to be personalized without disrupting the existing, meticulously orchestrated, animations.
This time around, I am pleased to report that I finally achieved success!
Here are the instructions for Method 2: ('the work around').
This method will be discussed using the 6 Little Monkeys Jumping on the Bed VI resource.
This method will be discussed using the 6 Little Monkeys Jumping on the Bed VI resource.
Step 1: Duplicate the monkey #1 graphic. Move it down toward the bottom of the page to minimize confusion.
 |
| Duplicate the graphic |
Step 2: Drag the photo face (created with a transparent background) on to the PowerPoint slide.You can also bring in the image using the Insert picture tab. If you require further information on how to make photo faces with transparent backgrounds, please check out the following blog post http://bit.ly/PhotoFaces
Step 3: Select the photo face that you have just added to the page and size it to completely cover the existing monkey face. (Don't forget to hold down the shift key when you re-size to maintain
the correct proportions; you can also flip or rotate the image to optimize its appearance)
the correct proportions; you can also flip or rotate the image to optimize its appearance)
 |
| Add & re-size the photo face |
Step 4: Select the 'duplicated monkey' and select the photo face while holding down the shift key (monkey body + photo face). Group these two components. You will note that the
animations assigned to the monkey image are lost when you perform this action.
animations assigned to the monkey image are lost when you perform this action.
 |
| Group the monkey body and photo face Save as Picture |
Step 5: Now the grouped image (monkey body + photo face) must be converted into a graphics file that can be imported/substituted for the original animated monkey. Right click on the new grouped image, then select Save as Picture from the drop down menu. Give the newly saved file a distinct name, e.g., Monkey 1- Rayhana. I always save to the desktop where I can easily find my 'newly minted' graphics.
Step 6: Right click on the original monkey image. Select Change Picture from the 'drop down' menu. Navigate to the desktop where you have stored the altered graphic (e.g., Monkey 1-
Rayhana). Presto the original Monkey #1 is replaced with the personalized monkey without
disturbing the animation sequence! Yay!
 |
| Use the Change Picture tool to import the new graphic |
Repeat this procedure for all 6 monkeys. You will then need to replace the monkeys on each page of the resource.
Obviously it is easier to incorporate photo faces on resources that are specifically designed to accommodate photo faces. Method 2 does require more steps ... but the extra effort is well worth the additional engagement that will occur as a result of personalizing.
Go forth boldly and personalize!!!!!!
... 'til the next post
Follow me on twitter www.twitter.com/@AnimStepbySteps
Email me canadiangoosse@gmail.com
©2018 Carol Goossens’, Ph.D.
Augmentative Communication Consultant
Speech-Language Pathologist
Special Educator

