Over the years I’ve added symbol support to my Animated Step-by-Steps in several of my classrooms. It is not unusual for the teacher to be addressing a literacy agenda using the regular version on the interactive whiteboard,
while a student is viewing a symbol-supported version on their laptop. Typically this individual is being assisted by
a para who is assigned the task of
making sure the computer version is keeping pace with the Interactive
Whiteboard version. Now that I know there’s a Microsoft PowerPoint app the possibility exists for using the
iPad to present a symbol-supported
version to a student in need of symbol support. Symbol supported versions are primarily used with students needing lots of exposure to symbols with the hope that this exposure will translate to greater understanding and use of picture symbols for communication.
So how do you get the symbols embedded in the files that
you’ve downloaded from the Teachers Pay
Teachers site.
 It is important to note the Animated Step-by-Steps were
designed to accommodate picture symbols.
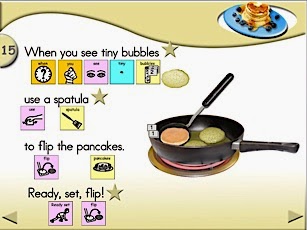
As you can see in this illustration, there is sufficient space between
the lines of text to add .8” symbols. I have not added symbols to the downloaded TpT files primarily because there is so much
variation in the symbols people choose to use and the color coding they prefer.
Illustrated below are two commonly used symbol sets: SymbolStix and PCSymbols (the
latter is depicted with two variations of color coding). Feel free to add your
symbol set of choice and whatever color coding system works best for addressing your needs.
Step 1 Convert the Animated Step-by-Step file to an editable format
Convert your downloaded PowerPoint Show file (.pps) into a
regular PowerPoint Presentation file (.ppt). Simply change the tag .pps to .ppt. It will now open as
an editable version of the file. If you are using a Windows computer you may
need to set your computer to display file
types.
If you are using a more current version of PowerPoint (.pptx), you may wish to
upgrade the file to this more advanced version. To do
this simply open the file, then
select File on the menu bar …. the save as function …. then PowerPoint
Presentation (.pptx) in the dropdown menu.
Step 2 Make the symbols
If you are using Boardmaker symbols, create the symbols that
you will need to symbolate your file. I typically symbolize only the content words, not the high frequency
‘little’ words like ‘a’ and ‘the’. I do symbolate words like ‘in’ and ‘on’
because the symbols do suggest their meaning. As you can see my symbol template
(on the left is designed for 2” symbols and each cell has an xxxxx text
placeholder. When creating symbols, it is helpful to establish consistency of
font and font size. By using a template with text placeholders this consistency
is assured within a school. With
the text tool selected, place your
cursor in the xxxxxx, double click to select it, then ‘type over’ the xxxxxxx (do not
delete it). This procedure ensures that
you will have the same text across all of your converted files.
Step 3
Transfer the symbols to your PowerPoint
Transfer the symbols you’ve made to your PowerPoint file.
Click the cursor on the inside cell (not
the text or the symbol) of the first symbol you wish to transfer. A dotted line
will appear around the cell. Copy the symbol to the clipboard, then open the
target page of your Animated Step-by-Step and paste the 2”symbol on the page. Unfortunately
this process must be done symbol by symbol. If you try to select a group of
symbols they will copy and paste as a group rather than individual symbols.
Step 4 Size
your symbols
You will need to adjust the size of your symbols to fit beneath
their corresponding text. When you paste the symbol into the file it is much
larger than the .8” square size that you need.
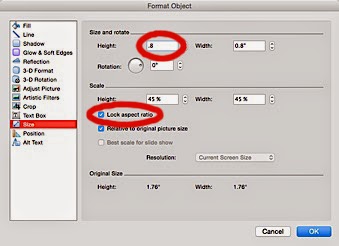
 Right click on the larger symbol then select Format Picture from the drop down
menu. This opens a dialog box. Select size from the options on the left hand panel. Lock
the aspect ratio and type in .8”.
I
typically paste all the 2” symbols that I need on the page and then ‘batch
size’ them as a group . To do this click on all the symbols consecutively while
holding down the shift key … then right click on one of the symbols and apply the sizing.
Step 5
Position your symbols on the page
 Position the symbols directly under their corresponding
text. I always try to position the symbols a bit closer to their line then the
line below.
Step 6 Expediting
Future Assembly
If you are planning to ‘symbolate’ a lot of Animated Step-by-Step files, consider copying
and pasting your .8” symbols into alphabetized word documents. I established a word file for every letter of the alphabet and over
the years have routinely pasted .8" symbols into their corresponding letter files. This greatly
expedited the process of adding symbols to Animated Step-by-Step files as it
completely bypasses the need to make and size symbols that you’ve already
created.
Hope the task of symbolating your Animated Step-by-Steps
goes smoothly.
... ’til the next post …
© 2015 Carol Goossens’, Ph.D.
canadiangoosse@gmail.com


