
In a previous post I discussed the ease with which you can ‘harvest’ symbols from your Animated
Step-by-Steps® and add them to your ‘Core
48’ PowerPoint Display. It’s a relatively easy way to provide both text & symbol support to a lesson that might not normally have the benefit of these supports.
http://bit.ly/Core48Displays
(blog post on harvesting symbols from ASbyS)
https://www.teacherspayteachers.com/Store/Bloom/Search:Core+48+displays
(link to Core 48 displays on the TpT site)
http://bit.ly/Core48Displays
(blog post on harvesting symbols from ASbyS)
https://www.teacherspayteachers.com/Store/Bloom/Search:Core+48+displays
(link to Core 48 displays on the TpT site)

This PowerPoint display might be projected on the interactive whiteboard during a group lesson or it might be displayed on an individual child's iPad

This strategy of using a template with xxxxxxx text place holders assures consistency of font
longer possible). I typically use Snapz Pro X for screen shots, but you can certainly use the
5. Each cell + text + symbol is then selected (holding down the shift key) and is copied and pasted

7. You can opt to add voice-output to the fringe symbols. For more information on using
choice, font size and placement across the many professionals in your organization that might be
generating similar shared content.
For PCS (Tobii/Dynavox)
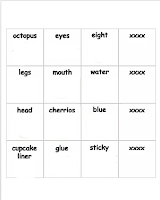
1. Type
the text labels for your fringe
vocabulary into your PowerPoint Symbol Template. Double
click on the xxxxxx and
type the text you wish to add to the cell (Note: do NOT delete the
xxxxxx’s …
select and ‘type over’ the placeholder text)

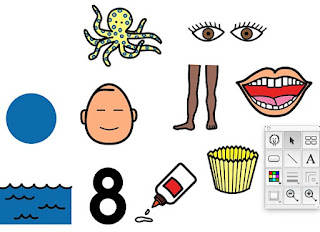
2. Gather
all the needed fringe symbols on a blank
Boardmaker page

3. Take
screen shots of each individual symbol (save
to your desktop).
(In the past I was able to copy and paste symbols directly into PowerPoint but that seems to be no longer possible). I typically use Snapz Pro X for screen shots, but you can certainly use the
free screen shot capability of your operating system.
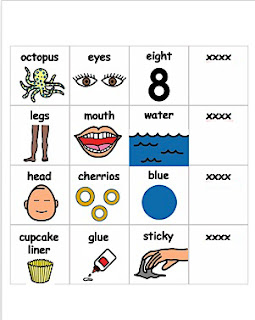
4. Drag
each symbol jpeg that you created into their respective cells on the PowerPoint
grid
template.

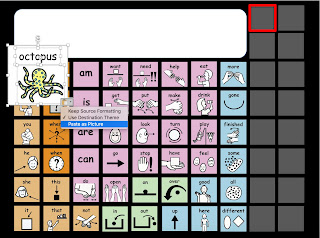
5. Each cell + text + symbol is then selected (holding down the shift key) and is copied and pasted
(as a single unit) into the ‘Core 48’ PowerPoint Display. After the symbols have been pasted
on
the page, you will be converting them into a picture. If you place your cursor in the right corner
of the image a clipboard icon will appear with a drop down menu. Select Paste as Picture. The
cell + text + symbol will change into one consolidated image. The image is now one unit that can
be sized to .8 inches.

6. Drag
this newly minted and sized (.8) image to the fringe zone and place over one of
the grey
squares. Repeat the process
one-by-one for all the fringe symbols. You can even add images of
the final product to facilitate conversational exchange.

7. You can opt to add voice-output to the fringe symbols. For more information on using
Audacity to add voice-output to symbols please refer to a previous blog post.
http://bit.ly/ASbySs_ChildVoice
http://bit.ly/ASbySs_ChildVoice
8. Save each project as an individual
PowerPoint, e.g., Art – Cupcake Liner Octopus Project.
Sort your projects
into folders such as Food Prep, Art, Stories, Poems/Songs etc. allowing you
to share the project and re-introduce it the following year.
to share the project and re-introduce it the following year.
For SymbolStix (n2y)
The process is similar to that described for PCS with the exception of not having to take screen
shots of the images.
Add the text to the symbol cells on the PowerPoint Symbol Template.
Drag and place symbols downloaded from the SymbolStix online portal into the PowerPoint
Symbol Template
The remaining steps are identical to that previously outlined for PCS.
Happy symbolizing your fringe zone on your PowerPoint 'Core 48' Display.
…’til the
next post …
Follow me on
twitter www.twitter.com/@AnimStepbySteps
Email
me canadiangoosse@gmail.com
©2017 Carol
Goossens’, Ph.D.
Augmentative
Communication Consultant
Speech-Language
Pathologist
Special
Educator