Saturday, December 21, 2019

PowerPoint's Flexible Display Options

In many ways Microsoft PowerPoint is the perfect program for developing educational materials. Many classrooms have access to this ubiquitous 'cross-platform' program, providing maximum flexibility for home & classroom use. 

Upon creation, the PowerPoint resource can be flexibly displayed in a variety of  'big screen' or 'small screen' formats. 

Big Screen Formats:

Big Screen formats are especially useful for conducting group lessons. They can be used to either pace students through a shared project (e.g., making Pumpkin Loaf, Bean Experiment) or can be used to familiarize students with the overall scope of a project that will be conducted later in smaller 'hands-on' groupings, (e.g., Planting, Spin Art). 


Interactive Whiteboard

Interactive White Board (Smart)                                                                             TAPit         


When using the interactive whiteboard, students can trigger the animations directly by approaching and tapping the whiteboard or remotely from their seats by pressing a teacher-offered 1) infrared switch, 2) bluetooth switch, 3) a regular switch connected to the IWB computer via a switch interface, e.g. Switch Interface Pro (Don Johnson Equipment) or 4) by turning your iPad into a functional switch using the reasonably-priced Attainment Switch app. Additionally, several remote switch options have a jack to permit a student to use their individualized switch setup to trigger the animations. This option is especially beneficial when using control sites other than a simple hand activation, e.g., using the head, knee or elbow to trigger the animations. Suddenly the ASbyS resource becomes an excellent vehicle for switch training both within and outside the classroom! A 'safe zone' is provided on each page of an AsbyS resource to minimize the results of accidental activations.

A chart of remote switch access is available in a previous post 

Apple TV

If you have an iPad/iphone you can use Microsoft PowerPoint's device-specific apps to display your Animated Step-by-Steps® (ASbySs) on your large screen TVusing Apple TV.  If you are using the iPad/android tablet you will need to download the PowerPoint app designed for the iPad; if you are using the iPhone you would need the iPhone version.
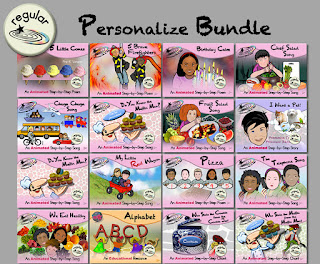


The ability to display an ASbyS on a large screen TV is especially fun when the resource has been personalized with photo faces of classmates or family members.  For more information on resources that can be personalized, please check out the Personalized Bundle on the TpT site.  When using a large screen TV format, the animations are triggered using a swipe to the left on the source device, i.e., either the iPad or the iPhone used to airplay the resource.


Small Screen Formats:

Classroom Computer

Within the classroom, the computer can be established as an interactive center. Usually an adult assigned to this station collaboratively reading the content of the Animated Step-by-Step with a single or paired students who take turns triggering the animations by tapping the spacebar of the computer keyboard. Read up to the star then tap the spacebar to trigger the corresponding animation. A remote switch option similar to that discussed for interactive whiteboards is also possible when using the computer.


In the preschool classroom, ASbySs are typically chosen to support ongoing themes within the classroom.  Poems/songs are read three or four times over the duration of the unit. For example, if the Fall theme is Apples, several apple-themed poems/songs/recipes/crafts might be introduced.

Ipad/Android Tablet

Upon accessing your Microsoft 360 or installing the FREE Microsoft PowerPoint app on your iPad/Android tablet, you need to establish a link to a storage option, (e.g., Dropbox or Google Drive)… where your resources will reside ready to be imported for use into the app.


IPhone
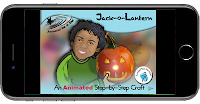
Yes, you can even use ASbySs on your iPhone … provided you have access to Microsoft 360 or the free Microsoft PowerPoint app specifically designed for the iPhone. This option is especially great for families attempting to minimize the wait time of family appointments. As previously discussed you do not need to have internet access to use resources previously imported into the app. 


Other Flexible Options for the Classroom:

If you need 'upclose and person', Splashtop Classroom offers the ability to mirror the contents of the Interactive Whiteboard (displayed for the benefit of the group) and displayed on the iPad (for the benefit of an individual student requiring something closer for viewing. This may be especially helpful for the student that is distractable or visually impaired. 


The bottom line:  Microsoft PowerPoint is a flexible format for designing and displaying highly interactive and engaging resources. 

In the Bloom Where You're Planted Store of the Teachers Pay Teachers site, several free resources are provided to allow therapist and educators to 'test drive' this flexible teaching format.

That's a wrap' for 2019! Hope to see you in 2020!

Visit my website   http://animatedstep-by-steps.com
Follow me on twitter www.twitter.com/@AnimStepbySteps
Follow me on facebook www.facebook.com/AnimatedStepBySteps
Email me canadiangoosse@gmail.com

©2019 Carol Goossens’, Ph.D.
Augmentative Communication Consultant
Speech-Language Pathologist
Special Educator

Friday, November 15, 2019

FREE Sweet Potato Pie Animated Step-by-Step Thanksgiving Poem

Having much to be thankful for, I have just posted a FREE Thanksgiving poem called
Sweet Potato Pie. This resource, originally derived from the web (author unknown), is available in three formats: Regular, PCS, and SymbolStix and can be downloaded from the Bloom Where You're Planted Store on the Teachers Pay Teachers site.


Although this is NOT a traditional Thanksgiving Poem, it is a wonderful vehicle for familiarizing students with the pies that might appear in their Thanksgiving feast (pumpkin, apple, lemon meringue, sweet potato pie) : )


Hope you enjoy using this resource with your students.


…’til the next post … 

Visit my website   http://animatedstep-by-steps.com
Follow me on twitter www.twitter.com/@AnimStepbySteps
Follow me on facebook www.facebook.com/AnimatedStepBySteps
Email me canadiangoosse@gmail.com

©2019 Carol Goossens’, Ph.D.
Augmentative Communication Consultant
Speech-Language Pathologist
Special Educator

Monday, November 4, 2019

Animated Step-by-Steps® on the iPhone!


I've been using the free Microsoft PowerPoint App with the iPad/Android tablet in classrooms for years but it is only recently that I downloaded the app to 'test drive' the iPhone version


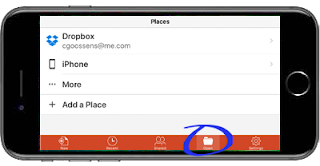
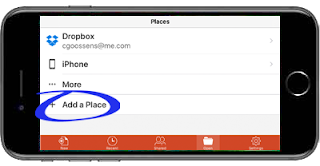
I placed several Animated Step-by-Steps® (ASbySs)  in my Dropbox (you could also use Google Drive) and linked the iPhone version of the Microsoft PowerPoint App to my dropbox. I used the Add a Place command to establish a link between the app and dropbox.


I then used the Open command on the tool bar at the bottom of the screen to upload a maximum of 200 mb or about 10 ASbySs into the app.


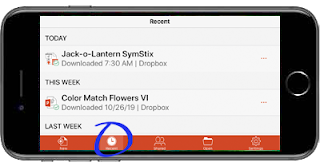
After your files are uploaded into the app, they will remain in a folder called 'recent' visible on the bottom toolbar. Although you need wifi to upload the files, you do NOT need wifi to use them! How convenient!

In your recents folder, click on the resource you wish to open. When a resource first opens it appears in edit mode (although technically you cannot edit with the free version of the app). Just press the play arrow on the top tool bar to put the resource into presentation mode.


All the animations and the sound effects of the resource are now operative and can be triggered with an index finger swipe to the left on the screen. 

Use the page arrows (bottom of the opened page) to move forward or backwards in the resource.


Note of caution: if the screen accidentally zooms out, the animations will not work. Simply use the pinch gesture to return the screen to normal size. 


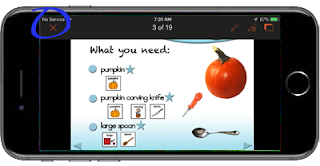
To exit the program, tap the top of the screen to reveal a tool bar, then select the X on the far left to take you out of presentation mode. 


Select the arrow on the top left to backtrack to where you can use the recent folder to select a different resource. 


So next time you are waiting somewhere with your child and you need a little entertainment, grab your iPhone … activate your Microsoft PowerPoint app and enjoy reading an interactive Animated Step-by-Step together!!!!

…’til the next post … 

Visit my website   http://animatedstep-by-steps.com
Follow me on twitter www.twitter.com/@AnimStepbySteps
Follow me on facebook www.facebook.com/AnimatedStepBySteps
Email me canadiangoosse@gmail.com

©2019 Carol Goossens’, Ph.D.
Augmentative Communication Consultant
Speech-Language Pathologist
Special Educator


Sunday, October 27, 2019

Jump on the Trampoline Song

Jump on the Trampoline Vest Display is available in two formats (PCS, SymbolStix) from Teachers Pay Teachers. This vest display visually supports a routine that I periodically see in classrooms serving students on the autism spectrum. The song successfully inserts a much needed 'active component' into the Circle Time Routine. 

In this activity, students take turns jumping on a small trampoline while the remaining class members sing the Jump on the Trampoline Song. At the end of the song the class collectively shouts "Stop!" A song button is provided in the resource revealing the tune for this simple song. 

When singing the song with the group, I typically alternate between pointing to the symbol line (JUMP, JUMP, JUMP ON the TRAMPOLINE) and manipulating the 'jumping person' on the display.

JUMP, JUMP, JUMP  … ON THE ... TRAMPOLINE (pointing to the symbol line)
Jump, Jump, Jump on the trampoline (manipulating the jumping person)
JUMP, JUMP, JUMP  … ON THE ... TRAMPOLINE (pointing to the symbol line)
NOW … it's TIME …. TO … (pause to encourage students to add) STOP! (pointing to the symbol line)


Jump on the Trampoline is a resource that must be personalized. The resource is designed with Dual=Representation Symbols (Student Photo=Printed Name; Student Photo=Boy/Girl Symbol) 
allowing you to work on photo/name recognition and boy/girl concepts. 


Working on Printed Name Recognition


To work on name recognition, students can be offered a choice of two printed names and are encouraged to find their name from a field of two. Upon selecting the name the Dual=Representation symbol is flipped to reveal whether their choice was correct. Their corresponding manipulative is then added to the vest display and a turn is provided. 


Working on the BOY/GIRL Concept

Read the symbol line WHO … IS … NEXT?  then comment,  "I'll give you a hint … it's a BOY (placing the Dual=Representation BOY symbol over the WHO symbol; the mystery boy is on the flip side). Can you guess who? Here's a hint, his name starts with the /j/ sound (adding a literacy agenda). You think it's Jeremy? Let's see (students are encouraged to 'drum roll' by alternately slapping their thighs) … (flip the Dual=Representation Boy symbol to reveal the mystery boy). Add their jumping image to monofilament line on the vest display.

Working on Color Concepts
There are two sets of people manipulatives: jumping boy bodies, jumping girl bodies to which student photo faces are attached.

When the manipulative is added you might comment, "Oh look, BESSIE  is wearing a dress that is … (pause) yellow".


Minimizing the 'Holding Tank'

When conducting a group activity involving turns, it is always crucial to maintain the interest of the students 'in the holding/waiting tank'. One simple strategy is to use the vest display to sing to the non-target students. You are singing to the non-target students ... NOT the target student. The target student is already engaged because he/she is in the 'spotlight' actively engaged jumping.

Consider using a single message communicator (e.g. BIGmack) programmed with the message, "stop!", as it provides yet another avenue for garnering greater engagement among the 'waiting' group. Students in the 'holding tank' are more attentive because they never quite know when they will be called upon to insert the message using the voice-output device). 


You also have the option of visually signaling the child 'on deck' by adding their photo face to the waiting chair on the scene.  Now there is a higher liklihood that an additional child will be engaged anticipating their imminent turn. 


We are not suggesting that you work on everything at one time but rather that the materials provided allow you to target a range of academic knowledge. Hope you enjoy using this simple but flexible resource.

…’til the next post …  

Visit my website   http://animatedstep-by-steps.com
Follow me on twitter www.twitter.com/@AnimStepbySteps
Follow me on facebook www.facebook.com/AnimatedStepBySteps
Email me canadiangoosse@gmail.com

©2019 Carol Goossens’, Ph.D.
Augmentative Communication Consultant
Speech-Language Pathologist
Special Educator

Tuesday, October 15, 2019

Thank You Horizon School

Thank you to the Horizon School (United Cerebral Palsy of North Jersey) for hosting my October 14th workshop titled, Using Aided Language Stimulation to Promote Literacy, Language and AAC

I really loved getting to tour their wonderful school and getting to meet so many dedicated staff members. 

Wishing them much success implementing the information received from this workshop! 

Monday, October 7, 2019

Harvesting Still Images From Emoji Me Stickers

A previous blog post discussed the use of graphics created with an app called Emoji Me. In that post you learned how to 'populate' your educational resources with faces created with the Emoji Me app. You also learned how to personalize existing Animated Step-by-Steps® by swapping emoji of your students, with the 'generic child images' currently displayed in these ASbyS resources. 

When you create an emoji you are primarily creating the face. Of interest to this blog post, however, is an additional capability of automatically generating animated stickers.


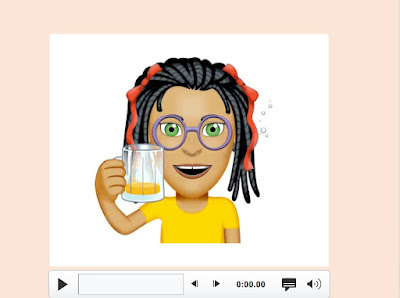
The sticker is a series of graphics that collectively form an animated sequence, saved as an .gif file


If you 'drag and drop' the .gif on to a PowerPoint slide, it will play automatically and continuously when in presentation mode. 

If you want more control over when the video starts, import the .gif using the insert video command. The file now inserts with a video play bar that must be activated to trigger the animation.  It will play only once, unless reactivated.


These .gif animations always import with a white background, so a white slide is optimal for display purposes.

Less obvious, however is the fact that you can also 'harvest' still images from the .gif for your educational resources.  Note all the layers that make up this .gif appear as layers in the Layers Window of Photoshop. If you want a specific non-animated 'still image' for your educational resource, you can turn off (make invisible) all the layers you don't want, while keeping the one layer/image that you do want turned on (make visible). Visibility is depicted as an eye icon in the small box to the left of the layer. 

SUMMARY: 
Open the Layers Window (Under Window on the Menu bar).
Turn on the eye icon for the layer/image you desire
Turn off the eye icon for all the other layers/images that you do not wish to use. Use the 'save as' command (under File) to save that single selected image as a new file on your desktop.  


If you have dropped out the background in Photoshop, be sure to save the file as a .png to preserve background transparency.

With respect to the latter, if you wish to overlap/superimpose your  emoji image on another image in your PowerPoint resource, you must make the emoji background transparent. You can drop out the white background of the Emoji in Photoshop (use the magic wand tool to select the white background, then delete the selected background) OR you can eliminate the background in Powerpoint (using the make background transparent tool). General instructions for making the background transparent are available in a previous blog post.

 Emoji mage with white background         Checkered background indicates transparency           Final resource


The Final Word: 

Emoji Me is a fabulous program for folks interested in creating engaging educational resources!

…’til the next post …  

Visit my website   http://animatedstep-by-steps.com
Follow me on twitter www.twitter.com/@AnimStepbySteps
Follow me on facebook www.facebook.com/AnimatedStepBySteps
Email me canadiangoosse@gmail.com

©2019 Carol Goossens’, Ph.D.
Augmentative Communication Consultant
Speech-Language Pathologist
Special Educator
Monday, September 30, 2019

Consider the Emoji Me App

When I was between jobs, I used the 'down time' to learn how to use a robust graphics program called Adobe Illustrator. I wanted  to create illustrations of children that could be used to 'populate' my Animated Step-by-Steps®

Although it is certainly more labor intensive to create illustrations 'from scratch', there is something very satisfying about creating your own 'little people' and not having to rely on clip art.  


Child Created Using Illustrator                                           Child Created Using Emoji Me App      


The satisfaction of creating your own characters can also be achieved using an app called Emoji Me
I love the Emoji Me app!  It allows you to easily create characters using your iPhone and iPad! The basic program is FREE with the option of making additional in-app purchases to supplement your library of options. 

The program efficiently walks you through the process of creating a face, first selecting boy vs. girl … choose the skin color … choose the hair style and color … select eye shape and color … select eyebrow shape and color … select the mouth … select the nose … now choose the face shape … do you need glasses? … how about a hat or bow? You get the picture … the Emoji Me designers have anticipated just about everything you might need … even freckles are an option! The app allows you to take or import a photo to serve as a visual reference while you are 'building' your emoji. Illustrated is the panel for selecting eye shape and color. While auditioning your selections, the emoji on the left always reflects your current choice. The following illustration shows how a picture of a 'generic girl' was systematically morphed into the emoji of a student in one of my classrooms. 


You can now select and send that emoji to yourself. Import it into a photo imaging program such as Adobe Photoshop  or Photoshop Elements … make the background transparent and presto you have an image suitable for using in your educational resources. 

                                    Export Emoji                                        Make background transparent in Photo Imaging Program


How will you use what you've created?

Consider making an emoji for each student and staff member in your class! Substitute these emoji for the illustrated faces in your ASbySs (i.e. an ASbyS amenable to being personalized - clearly marked on its title page)Simply right click on the original face … select change picture… navigate to where your emoji versions reside and presto you have successfully inserted an emoji version of your student into your Animated Step-by-Step. A previous blog post, Personalizing Animated Step-by-Steps® - Made Easier! provides illustrated instructions. Depicted below is the original cover and the revised personalized cover for the We Eat Healthy Resource.  


The Bloom Where You're Planted Store (TpT) offers numerous titles that can be easily personalized. Depicted below is a bundled resource offering 16 resources at a 20% discount. 


The process of making an emoji collaboratively with your students can also be a wonderful language activity. It provides the perfect opportunity to model Aided Language Stimulation on your Core + Fringe PowerPoint Voice-Output Display. "Now WE NEED to CHOOSE SOME EYES (Body Parts Pop Up Page). Everybody LOOK at Jasper's EYES.  Let's build a sentence about Jasper's EYES. Jasper HAS ...."

The possibilities are limitless … and as always the outcome is just plain fun! 

…’til the next post …  

Visit my website   http://animatedstep-by-steps.com
Follow me on twitter www.twitter.com/@AnimStepbySteps
Follow me on facebook www.facebook.com/AnimatedStepBySteps
Email me canadiangoosse@gmail.com

©2019 Carol Goossens’, Ph. D.
Augmentative Communication Consultant
Speech-Language Pathologist
Special Educator