Monday, September 10, 2018

The 'Outlining Animation'

Highlighting/Outlining is a strategy frequently used when working with children with Visual Impairment. This strategy highlights or outlines the target graphic to ensure that the child is focusing on the item under discussion. In Five Little Pumpkins, for example, an attention getting red line is gradually drawn around that target pumpkin ("The second one….") when it is the 'second pumpkin's' turn to speak. This allows the child to better differentiate the target pumpkin from the other pumpkins in the five-pumpkin array.


This is what the animation looks across a 5-second span. 
So how exactly do you make that magic happen?


This effect is easily achieved by stacking a pumpkin graphic (no outline) on top of pumpkin graphic (identical in size) but stroked/outlined in red. 


This outline can be created in a graphics program such as Photoshop or Photoshop Elements. When the outlined pumpkin is animated using the 'wheel' animation, it gives the effect of a red line being drawn (clockwise) around the pumpkin image. Magic, indeed!  

Pulling apart the two stacked images, this is what's happening 'behind the scenes' across a 5-second span:


So if you are using PowerPoint to create educational resources for students with visual impairment,  be sure to add this 'outlining animation' to your 'bag of tricks'. 

…’til the next post …  

Visit my website   http://animatedstep-by-steps.com
Follow me on twitter www.twitter.com/@AnimStepbySteps
Follow me on facebook www.facebook.com/AnimatedStepBySteps
Email me canadiangoosse@gmail.com

©2018 Carol Goossens’, Ph.D.
Augmentative Communication Consultant
Speech-Language Pathologist
Special Educator

Monday, August 27, 2018

Personalizing Animated Step-by-Steps® - Method 2

Personalizing has always been a very powerful technique for nurturing greater student engagement. In the past, only resources specifically designed for personalizing could be adapted with photo faces. Ideally, all ASbySs should be candidates for personalizing but gulp … the thought of going back to retrofit over 600 ASbyS resources made me 'weak in the knees'. 

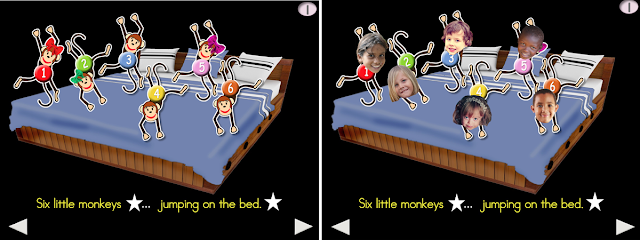
6 Little Monkeys VI  is a resource that I recently posted in my TpT Store. After posting the resource,  I promptly regretted the fact that I had not created the resource in a way that would allow for easy personalization.  ARRRRGH! How short-sighted of me!  So this had me agonizing ... yet again ... how can we retrofit existing resources allowing them to be personalized without disrupting the existing, meticulously orchestrated, animations.

This time around, I am pleased to report that I finally achieved success!


Here are the instructions for Method 2: ('the work around'). 
This method will be discussed using the 6 Little Monkeys Jumping on the Bed VI resource. 


Step 1:   Duplicate the monkey #1 graphic. Move it down toward the bottom of the page to minimize confusion. 

Duplicate the graphic


Step 2:  Drag the photo face (created with a transparent background) on to the PowerPoint slide.You can also bring in the image using the Insert picture tab. If you require further information on how to make photo faces with transparent backgrounds, please check out the following blog post http://bit.ly/PhotoFaces

Step 3: Select the photo face that you have just added to the page and size it to completely cover the existing monkey face. (Don't forget to hold down the shift key when you re-size to maintain
the correct proportions; you can also flip or rotate the image to optimize its appearance)

Add & re-size the photo face


Step 4: Select the 'duplicated monkey' and select the photo face while holding down the shift key (monkey body + photo face). Group these two components. You will note that the
animations assigned to the monkey image are lost when you perform this action.

Group the monkey body and photo face                                                  Save as Picture   


Step 5: Now the grouped image (monkey body + photo face) must be converted into a graphics file that can be imported/substituted for the original animated monkey. Right click on the new grouped image, then select Save as Picture from the drop down menu. Give the newly saved file a distinct name, e.g., Monkey 1- Rayhana. I always save to the desktop where I can easily find my 'newly minted' graphics. 

Step 6:  Right click on the original monkey image. Select Change Picture from the 'drop down' menu. Navigate to the desktop where you have stored  the altered graphic (e.g., Monkey 1- 
Rayhana). Presto the original Monkey #1 is replaced with the personalized monkey without
disturbing the animation sequence! Yay!

Use the Change Picture tool to import the new graphic


Repeat this procedure for all 6 monkeys. You will then need to replace the monkeys on each page of the resource.

Obviously it is easier to incorporate photo faces on resources that are specifically designed to accommodate photo faces. Method 2 does require more steps ... but the extra effort is well worth the additional engagement that will occur as a result of personalizing. 

Go forth boldly and personalize!!!!!!

... 'til the next post

Visit my website   http://animatedstep-by-steps.com
Follow me on twitter www.twitter.com/@AnimStepbySteps
Follow me on facebook www.facebook.com/AnimatedStepBySteps
Email me canadiangoosse@gmail.com

©2018 Carol Goossens’, Ph.D.
Augmentative Communication Consultant
Speech-Language Pathologist
Special Educator

Monday, August 13, 2018

New Product Line - Animated Step-by-Steps® for Children with Visual Impairments

A mother recently inquired about the availability of Animated Step-by-Steps® (ASbySs) for children with Visual Impairments.  Although many of the current ASbySs do possess qualities beneficial for children with visual impairments (clear graphics, good figure-ground differential), they did not specifically address the unique needs of children with more severe visual challenges. So….. in an attempt to better serve this population, I re-designed and posted a new product line.

Regular Version                                                                                      VI Version      

Regular Version                                                                                      VI Version


When designing these resources I focused on:

-using simple vector-based graphics
-outlining the graphics with either a black or a black + white border to help the visuals 'stand out' from the page.


-using eye-catching colors such as red, yellow and white to grab visual attention;
-presenting the graphics on a black background to promote more optimal 'figure-ground differential';


-incorporating realistic animations to grab and guide visual attention;
-incorporating sound effects to deepen conceptual understanding and alert the child to the presence of an ongoing animation;
-providing simple text with good figure-ground differential (yellow or white text on a black background). If you are using an iPad, a 'gesture' can be used to enlarge the text.  
-incorporating a 'safe zone'(camouflaged as the page number) to allow the Animated Step-by-Step to promote more errorless switch training for children with both visual and motor challenges; 
 -some (but not all) of the resources can be personalized with photo faces of your students, e.g., 5 Little Cones.


Current VI titles include:

5 Little Ducks VI 
5 Green and Speckled Frogs VI
5 Little Cones VI
6 Little Monkeys Jumping on the Bed VI
Apple Tree VI
Aiken Drum VI
5 Little Snowmen VI
B-I-N-G-O and Friends VI
6 Little Gingerbreads VI
Brownies VI
Instant Pudding VI
Apple Juice VI
Rice Krispie Treats VI
Color Match the Flowers VI
Instant Oatmeal VI
Helping Mister Potato Head VI
Applesauce VI
5 Fat Turkeys VI
Chuga Chuga VI
5 Little Pumpkins VI
I Want a Pet VI
Jack-o-Lantern VI
Counting Snacks for Baby VI


These resources can be purchased from The Bloom Where You're Planted Store on the Teachers Pay Teachers web site. A bundled version of 9 songs/poems is also available for greater savings. 


Many thanks to super mom, 'Claire O' for setting me on this new fun path. 

…’til the next post …  

Visit my website   http://animatedstep-by-steps.com
Follow me on twitter www.twitter.com/@AnimStepbySteps
Follow me on facebook www.facebook.com/AnimatedStepBySteps
Email me canadiangoosse@gmail.com

©2018 Carol Goossens’, Ph.D.
Augmentative Communication Consultant
Speech-Language Pathologist
Special Educator  

Monday, June 4, 2018

Compress Pictures

Compress Pictures ... Who knew?  I'm pretty sure Microsoft knew. 

I recently discovered a Microsoft PowerPoint feature, Compress Pictures, that substantially reduces the memory of the currently available Animated Step-by-Steps®. I had always thought that the animations were the primary culprit for large file size, so I was understandably surprised when the pictures (that I had so carefully attempted to keep small) were not small. 

When the Compress Pictures feature is applied to resources, the overall memory of the files are reduced ... sometimes substantially!  Notice the shift in memory that occurred after the Compress Pictures feature was applied to two sample resources. 


If you are creating PowerPoint-based educational resources for your students, here are the step-by-step instructions for reducing memory size:


1. Open the PowerPoint resource.

2.     Under File on the Menu Bar, select Compress Pictures (Apply to all is the default setting)

3.     Select onscreen 150 dpi

4.     Save your optimized file with a revised name (I usually just add an R)


Note of warning:  A few of the pictures may render with opaque rather than transparent backgrounds, so you may need to redo some of the images to make the backgrounds transparent. The substantial reduction in memory, however, is well worth the additional 'touch up' necessary for some images.  


Recently, I did go back to optimize all of the Animated Step-by-Steps® (Regular, PCS, SymbolStix) in the Teachers Pay Teachers Store. If you have purchased Animated Step-by-Steps® in the past, you should be receiving notification of the availability of an updated version.  This should greatly alleviate any problems you may be experiencing running ASbySs on your 'almost full' iPads and computers.  : )

Here's hoping the reduction in memory will allow your ASbySs to run efficiently and smoothly on the full spectrum of options for displaying Animated Step-by-Steps® (interactive whiteboard, computer, iPad, graphic tablets).

…’til the next post …  

Visit my website   http://animatedstep-by-steps.com
Follow me on twitter www.twitter.com/@AnimStepbySteps
Follow me on facebook www.facebook.com/AnimatedStepBySteps
Email me canadiangoosse@gmail.com

©2018 Carol Goossens’, Ph.D.
Augmentative Communication Consultant
Speech-Language Pathologist
Special Educator

Monday, May 21, 2018

Vest Displays ... the SymbolStix versions

Last year I posted several Vest Displays reflecting the use of Picture Communication Symbols (Tobii/Dynavox).

Recently, I posted the SymbolStix (n2y) version of those displays.
Resources are available as individual titles or can be purchased as a money saving bundle.

The Big Vest Display Bundle - SymbolStix includes the following titles:


1. 6 Little Monkeys Jumping on the Bed
2. Twinkle Little Star
3. Itsy Bitsy Spider
4. Wheels on the Bus
5. Aiken Drum
6. 5 Little Snowmen
7. Down on Grandpa's Farm
8. My Little Red Wagon
9. 6 Little Cones
10.Where's Your _______ ? 
11. Pizza
12. Apple Tree
13. 5 Green & Speckled Frogs
14. 6 Little Ducks
15. Old MacDonald Simple Version


…’til the next post.

Visit my website   http://animatedstep-by-steps.com
Follow me on twitter www.twitter.com/@AnimStepbySteps
Follow me on facebook www.facebook.com/AnimatedStepBySteps
Email me canadiangoosse@gmail.com

©2018 Carol Goossens’, Ph.D.
Augmentative Communication Consultant
Speech-Language Pathologist
Special Educator

Wednesday, May 16, 2018

Rice Krispie Treats Have Arrived!!!!

Rice Krispie Treats are definitely a childhood favorite. In the process of making this Animated Step-by-Step version, I just HAD to make a batch … and of course I couldn't stop until I HAD eaten the whole pan … by myself … by 10 am the next morning. 


There is something about Rice Krispie Treats that makes them irresistable.  This is probably the only Animated Step-by-Step that could possibly knock, Helping Mister Potato Head off the Animated Step-by-Steps® best seller list. 

This simple recipe has three ingredients … butter … marshmallows … and rice krispie cereal. Most schools have access to a microwave (somewhere within the building), so its relatively easy to melt the butter and marshmallows … fold in the rice krispies …. pack that heavenly concoction into a greased pan … pop the pan into the refrigerator to chill and presto you have a delicious treat.  

You can even use a larger pan to make thinner rice krispie treats, then use cookie cutters to make rice krispie treats in various shapes. 


The Rice Krispie Treats Animated Step-by-Steps® are available in three formats: Regular, Picture Communication Symbols, and SymbolStix from Teachers Pay Teachers 
https://www.teacherspayteachers.com/Store/Bloom/Search:Rice+Krispie+treats 

…’til the next post … 

Visit my website   http://animatedstep-by-steps.com
Follow me on twitter www.twitter.com/@AnimStepbySteps
Follow me on facebook www.facebook.com/AnimatedStepBySteps
Email me canadiangoosse@gmail.com

©2018 Carol Goossens’, Ph.D.
Augmentative Communication Consultant
Speech-Language Pathologist
Special Educator